A Midsummer Evening with Friends


Pizza Dough Recipe (makes four 400g dough balls):
Ingredients for the Pizza Dough:
- 1 tablespoons honey
- 1 ½ cups warm water
- 1 packages dry active yeast
- 3 cups all-purpose flour, plus more for dusting
- 1 T extra-virgin olive oil, plus more for rubbing
- 1 ½ tablespoons kosher salt
- 1/4c extra flour for kneading
(oil the extra bowl)
Instructions for the Pizza Dough:
- Measure the honey, water and yeast into a bowl; set aside until yeast rises (10-15 minutes)
- Stir in the olive oil, flour and salt
- Turn onto a very lightly floured surface, and knead (add no more flour, or the dough will be tough; just continue to knead until the dough is no longer sticky)
- Place the dough in an oiled bowl, cover with plastic wrap, and rise until doubled
- Flour counter very, very lightly; turn the dough onto the counter (dust hands with flour or dough will be sticky; do not add more flour); divide the ball into 4 parts, or use a scale to weigh each portion (400g portions are a good size for a pizza)
- Roll each piece into a ball and place on an oiled baking sheet. Rub the dough balls with oil, cover with plastic and refrigerate overnight OR
- Wrap each ball individually with plastic wrap, label with name and date, and freeze
- When ready to use, remove from the freezer, thaw overnight in the fridge; remove an hour before to rise at room temperature
- Spread dough over surface area for your pizza: if it resists and springs back into a smaller disc, let it rest 15 more minutes, and it will then become more pliable
Thermomix Instructions for the Pizza Dough:
- Measure the honey, water and yeast into the TM bowl; set time at 2 minute, temperature at 37°C and speed at 2
- Scale olive oil, flour and salt into the TM bowl; combine ingredients for 20 seconds speed 0-4
- Set time at three minutes, select knead option at soft speed
- Place the dough in an oiled bowl, cover with plastic wrap, and rise until doubled
- Flour counter very, very lightly; turn the dough onto the counter using a bread making spatula to release the dough gently from the bowl (dust hands with flour or dough will be sticky; do not add more flour); divide the ball into 4 parts, or use a scale to weigh each portion (400g portions are a good size for a pizza)
- Roll each portion into a ball and place on an oiled baking sheet. Rub the dough balls with oil, cover with plastic and refrigerate overnight OR
- Wrap each ball individually with plastic wrap, label with name and date, and freeze
- When ready to use, remove from the freezer, thaw overnight in the fridge; remove an hour before to rise at room temperature
- Spread dough over surface area for your pizza: if it resists and springs back into a smaller disc, let it rest 15 more minutes, and it will then become more pliable
The Blue Pear: Recipe
Ingredients:
- 400 g of Pizza Dough (recipe to follow all pizza recipes)
- 4 ounces of Walnut Pesto
- 1 red and 1 green pear, cored and sliced with a squeeze of fresh lemon
- 65 g of whole walnuts, toasted
- 3 – 4Â medium bocconcini cheese balls, sliced
- 65 g of Gorgonzola Cheese
- fresh baby arugula; enough to cover the pizza
- 1 sheet of parchment paper, or a silpat, cookie sheet, and tongs
See the Grilled Pizza Slide Show in the Gallery for detailed pictorial instructions
Walnut Pesto Recipe (seven 125g portions):
Ingredients for the Walnut Pesto:
- 7Â Â 4 ounce containers to freeze pesto in
- 7 “œWalnut Pesto” dated labels
- 200 g parmesan cheese
- 60 g parsley leaves and tender upper stems, or no stems (approximately 2 larger bunches, but weigh for accuracy)
- 200 g walnuts, toasted
- 6 cloves of garlic, cleaned
- 150 ml walnut oil
- 150 ml olive oil
- 1 t salt
Instructions for the Walnut Pesto:
1. Toast the walnuts in a frying pan over medium heat (about 90 seconds), stirring constantly
2. Carefully weigh all of the ingredients into the food processor, and process until coarsely blended, not pureed
3. Fill the containers, label and freeze until ready to use
Preparing 400g of the Pizza Dough for the grill:
- Heat the grill to  high, and oil it (See the little “gadget” in the first photo frame below)
- Stretch and pull the dough onto the back side of a cookie sheet until it is the same size, or a little smaller than the cookie sheet
- Pick it up and place, or throw, it onto the grill, pulling the edges out once it lands on the grill as it will contract, to increase the surface area of the pizza
- Watch it carefully, as this just takes 1 or 2 minutes; turn it over (using tongs) when it is bubbly all over, and grill marked well on the underside: the dough will lift off of the grill when it is ready (you will not have to rip it, or tear it from the grill surface)
- Grill the underside for only about 30 seconds, just enough to slide it back onto the cookie sheet without sticking (this is the side you will cook once the toppings are on)
Putting The Blue Pear Together:
- Cover the grilled side with the pesto (it will seem like there i not enough, but there is: spread it all the way to the edges), then place each of the ingredients onto the pizza in the order listed above, except the arugula
- Turn the grill down to medium, slide the pizza back onto the grill (this is tricky as the bottom may be a bit sticky, use two tongs, or a huge under paddle) and close the lid (be careful not to burn the crust)
- When the cheese is melted, the pizza is done (3 to 4 minutes)
- Slide it back off of the grill, and don’t forget to cover it with the tender , spicy, baby arugula greens
- Slice and serve immediately
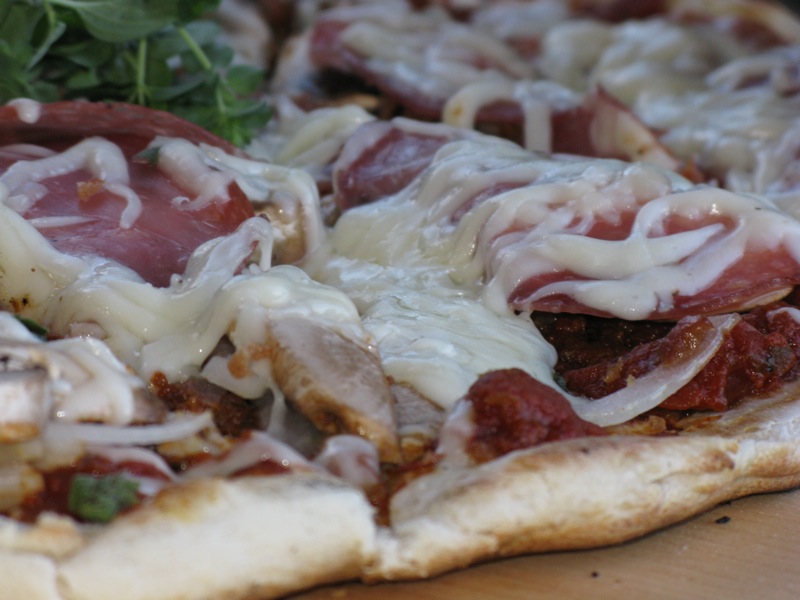
The Metropolitan Meat(“Ah-ha! A “real” pizza!”)


The Metropolitan Meat Recipe
Ingredients:
- 400 g of Pizza Dough (recipe to follow all pizza recipes)
- 125g (1/2 cup) homemade tomato sauce
- 250g (1 cup) meat sauce
- 100g of salami i prosciutto, thinly sliced, or shaved slices of ham (prosciutto cotto), or jamón Serran
- 1/2 large onion, thinly sliced
- 65g of bacon, fried and crumbled
- 3-4 mushrooms, thinly sliced
- very thin slices of fresh tomato
- fresh oregano, to taste (some on top of the cheese, for colour)
- 300g mozzarella cheese, shredded
Meat Sauce Recipe
Ingredients for the Meat Sauce (makes 8 cups) :
- 1 kilo lean ground beef
- 1 large onion, diced
- 6-8 large cloves of garlic, minced
- salt and freshly ground pepper, to taste
- 1 tablespoon oregano
- 1 tablespoon basil
- 1 small can of tomato paste
- 1 28 ounce can of diced tomatoes
- Sautéthe onion and the beef until the beef is brown, and the onion, transluscent; drain the fat
- Add the garlic, salt and pepper, oregano and basic; sautéabout 30 seconds and then add the tomato paste
- Sautéa couple of minutes until all ingredients are covered with the paste, and the paste begins to evaporate
- Add the diced tomatoes, and then simmer for one to two hours until the liquid has evaporated, and the sauce is very thick ( a spoon running through the sauce can easily separate it)
- Freeze one cup each zip-lock bags clearly marked and dated, until needed
- 1 whole large onion, diced
- 2 tablespoons of olive oil
- 2 stalks of celery, diced
- 2 carrots, peeled, and diced
- 2 bulbs of garlic, cloves minced
- 2 tablespoons each of oregano and basil
- salt and pepper, to taste
- 2 small tins of tomato paste
- 1 extra large tin, or four 28 ounce tins of diced tomatoes
- Sautéthe onion in the olive oil; add the carrot and celery; sautéfor 2-3 minutes
- Add the minced garlic,oregano, basil and salt and pepper to taste; sautéfor about 30 seconds
- Add the tomato paste, and stir to combine, still sautéing for about 2 more minutes
- Add tomatoes, and with the lid off, simmer at the back of the stove, stirring occasionally until the sauce is very thick and flavourful (2 to 3 hours)
- Freeze in half cup, one cup, and two cup portions; lable, and date
- Thaw as needed, overnight in the refrigerator,and use
- Spread the Tomato Sauce on the pizza dough; it will look like there is not enough, but brush it on, or use a flat edged spatula to ensure there is some everywhere (all the way out to the edge of the crusts) and there will be plenty of flavour there
- Sprinkle and spread the meat sauce over the top of the tomato sauce to again cover the entire crust (yes, all they way out to the edges, again)
- Add every other ingredient in the order listed above, and though it may not seem as though there is enough of each, just ensure that you have a little on every part of the pizza (out to the edges)
- I bet you get the idea by now….
(See the slide show titled: Grilled Pizzas in the Gallery for pictoral instructions)


The Caprese is my personal favourite!
The Caprese Recipe
Ingredients:
- 125 g (1/2 cup) homemade sundried tomato pesto
- 4 whole (8 halves)Â oven roasted tomatoes
- 4-5 medium Bocconcini balls, sliced
- a handful of fresh basil leaves (or 10 large leaves)
Vine-Ripened Oven-Roasted Tomato Recipe (enough for 6 pizzas)
Ingredients for Oven-Roasted Vine-Ripened Tomatoes:
- 24 vine ripened tomatoes, washed and halved
- 2 heads of garlic cloves, peeled and sliced
- 1/2 to 1 cup of extra virgin olive oil
- kosher salt, or sea salt
- Place each tomato half face down on a pyrex baking pan; drizzle generously with olive oil
- Sprinkle with salt and garlic slices; this will be one large, or two medium pans
- Bake in convection oven at 170ºF for 12 to 24 hours, depending upon the size of the tomatoes, turning them twice during the baking time
- Pack 8 halves (4 whole tomatoes) with some of the garlic and oil into freezer containers
- Label, date, and freeze until needed, then thaw overnight in the fridge, and use
Sundried Tomato Pesto Recipe (9 portions)
Ingredients for Sundried Tomato Pesto:
- 9 Â 125g, or four ounce freezer containers
- 300 g Parmesan cheese
- 180 g sundried tomatoes
- 150 g of pine nuts, toasted
- 50 g fresh basil leaves
- 10 large cloves of garlic, cleaned
- 375 ml extra virgin olive oil
Instructions for Sundried Tomato Pesto:
- Weigh the pine nuts, and then stir in frying pan over medium heat until golden and toasted all over (heat pan first, add nuts and toast, will take less than 3 minutes and never leave unattended)
- Carefully weight all of the ingredients into the food processor, and process until coarsely blended, not puréed
- Fill 9 freezer containers, place on lid, and label, date and freeze
- Thaw over night in the refrigerator, and us
Putting it all Together I know you get the idea by now…. Sprinkle on the fragrant shreds of basil after the pizza comes off of the grill.

We are all hooked, and you will be, too, the first time you make one of these. I make a lot of the dough, sauces, and pestos at the beginning of the season, and freeze it so everything is ready to go whenever needed.
YUMMERS!
Enlarge the slide show by clicking on the bottom left corner of it; then run your cursor over the bottom of each image to reveal the text.
[nggallery id=14]


Fantastic!!!
We just got a BBQ last summer and our condo gets pretty toasty from the afternoon sun.
I am going to give the BBQed crust a try this summer. It will be a nice break from salads and other hot weather fare!
Thanks for the detailed instructions – I think technique is important in this case 🙂
I can get behind any back-yard-produced bread item that involves fire, this one included. I also agree that grilled breads are a crowd pleaser, no matter how simple. Makes a good case for our getting back to basics with what we eat, no?
I want this NOW!