In Honor of David Adjey and the Date with David Adjey at NAIT March 16, 2010
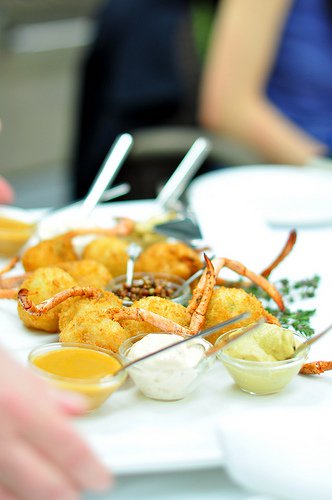
 The beautiful photo is taken by fellow blogger, Nikki, from The Read Onion. She is an amazing photographer and got the only photo of David Adjey’s signature Lobster Fingers, made by moi, before I whisked it away and placed it before him. She also took the beautiful photo of the lovely Isabelle from The Little Red Kitchen helping herself to one.

When invited to this event by Diane Begin with NAIT, I knew I had to learn more about Chef Adjey before attending. I also knew I had to make him something. That is what I do and. And, what better way to honor him than to put myself through a new learning experience by creating one of his signature dishes from his latest cookbook: Deconstructing the Dish. I chose his Lobster Finger which is a part of his Trout meal because I saw the episode of Restaurant Makeover where he made these and I thought the idea was brilliant. Now I had a reason to make them.


Dinner was Tuesday. It needed to be as fresh as possible, so immediately after school I drove out to Fin’s in Sherwood Park to pick up the major ingredients. I didn’t expect that I would be able to make the Lobster Sauce and I wasn’t going to have a kilo of shells, but asked in case they had them. They carry them all of the time. Good morning, Valerie! And shrimp shells, too, which I bought for some Shrimp Bisque for another day. So, two huge fresh lobsters, a couple of bags of the black tiger shrimp, double bunches of lobster and shrimp shells later, I was headed home to get started.


I had cooked lobster many times before, but never a fresh one. I wasn’t intimidated. I was just concerned that I didn’t over cook it, or under cook it. I had 4.2 kilo of lobster and knew that the water had to be at a hard boil before I put them in, and that I wasn’t to start timing the cooking until the water comes to a soft boil. I used a chart on how long to boil them as the instructions I found said it was done when the tentacles of legs were loose to a pull. Mine never were. The last photo above shows the water is beginning to heat again after plunging the lobsters in.

It took a considerable length of time to get the water back to a soft boil and then I kept it on high, and took both out after 16 minutes. The charts indicated less time, but nothing was loose of wiggling on my little creatures, so I cooked them a touch longer, then plunged them into ice water. Look at the steam rising off of these beautiful specimens. I took a quick photo and then back into the ice water to stop the cooking process.


Turn the lobster over, and bend the tail off of the body. It pulled away revealing the the greenish substance you see, called the “tomalley” or liver, inside of its body. Many consider it a delicacy. I thought it was delicious.The tail is gone, so there is the body and the claws left.

Remove the claws in the same manner the tail was removed. Yes, it is that easy.


Not so easy to get the meat out. But, as the claw shells aren’t going on display, a quick smash with the side of my knife enabled me to rescue the delectable morsels. All that is left is the body and I need the legs for the “Lobster FIngers”. There is so little meat on this lobster, that there was nothing to salvage from the body except the shells and the tomalley.


Pull the back away from the legs. Set aside the back and the tomalley to work at separating the legs for the individual presentation. Turn it over, and cut down the middle with a knife.
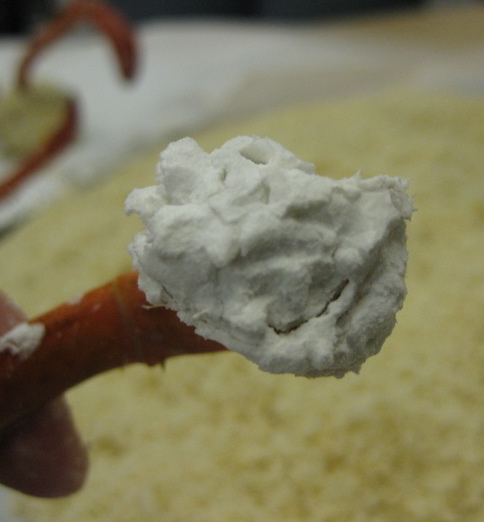
 Separating each leg is now very simple. There is a white cartilage that protrudes out of the end of each leg. I removed most of it, and left on just enough to hold the meatball I will be attaching shortly.

At this point, I packed up the fingers, cleaned them, and refrigerated them until the following day. Dinner Day. Chef Adjey Day. A school teaching day.
I turned my time to step two of this little after school project: Making the meatballs that would later attach to the legs.

Between the two lobsters, I had 9 ounces of lobster meat: enough for three batches of Adjey’s recipe. I only had legs for two batches, so I just made a set of the balls without their artisan appendages.


I cleaned, deveined, and removed the tails off of the beautiful black tiger shrimp. I scaled them into my Thermomix and whizzed them until they were a paste. This was part of the binding that was added to the lobster meat.


Into the refrigerator this went while I made the cream binding. I found it very much like making Spanish Croquettes. The Spanish recipe has more butter and flour and less cream, but the idea is the same. And, as I kept cooking to reduce the cream, the result appeared very similar.


The cookbook said to cook it for 8 minutes until all of the liquid completely disappeared. I cooked it for 12 minutes, and the fat was starting to separate from the cream. I had to use it as it was. I believed this would make a beautiful meatball with the shrimp and lobster as I have made Spanish Croquette’s with nothing in them but a very similar bechamel and the final product was excellent. I placed this mixture in a bowl and refrigerated it to chill completely before mixing it with the shellfish mixture. This is the step Chef Adjey said I didn’t do correctly when he tasted my Lobster Finger. I would like to see how his looks when he makes it, so I know what he means. This was definitely cooked to its maximum as the fat was beginning to separate out of the cream.
So, I packed up everything in the morning to take to school and complete just prior to out dinner with Chef Adjey. I will add, that while I was doing all of this, I was also making the Lobster Sauce to be posted next. So, that got packed up, too. Last class of the day I have my grade 9’s. They were making their first homemade pizza. They had made the dough and the sauce in two other classes. Today, they were reaping the reward and putting it together with some shredded cheese. Thus, the class was short, and simple.
I got out my lobster to get started after class with my Catering Club. Most of my students had never seen a lobster, and were completely enamoured with the legs and the idea of what I was doing. Class ended, the Catering Club students came, and we got started (after scrubbing hands with aprons on, and hair back).


The cornstarch Adjey suggested to use on your fingers and on the end of the leg worked like a charm. The lobster mixture connected beautifully to it, and then I rolled it in the suggested panko crumbs. This is what I know one of my mistakes was. I “should have” just left the little balls enrobed in the cornstarch until all were completed, dunked them into the batter, and then rolled them in panko just before frying. I don’t have much experience with deep frying. The instructions make assumptions that you would know what to do as the batter and the panko is listed only in the ingredients of this recipe. There are no further instructions on what batter to use, or what order to do this in. I learned.

Here is Bailey doing the extra balls that I didn’t have legs, or “fingers” for. It is always so much more fun to cook with someone. I love the chatting and the storytelling that accompanies the process.


We got the oil in the frying pan to temperature; got the assembly line going. Unfortunately, all little balls had been covered with panko, so this is when we learned about what I “should have” done.

The dark ones were fried without the batter. The light ones were fried with the batter over the panko. The “just right” ones were fried with a second layer of panko over the Tempura batter. Obviously, the “crust” was going to be heavy to bite into with all the armour around this delicate little ball. Darn! It would have been light and lively had I simply left them, dipped them in the tempura and then the panko and fried them. I even think Chef A may have said I did everything perfect if he had eaten one like that. But, of course, I am not sure.


What I do know, was that the centres did taste lovely, the outside was crusty, and chewy and unappealing. And, I know why. To learn so much was extremely gratifying. I was outrageously disappointed that I wasn’t taking a perfect example of my work, and his idea, to him. But, I was taking a tray full of good intentions and a whole lotta love for the ideas he has inspired me with through watching him develop recipes on TV.


You talkin’ to me?

David Adjey’s Lobster Finger’s Recipe
Ingredients:
- 75g fresh lobster meat (tail, claws and knuckles)
- 125g raw tiger shrimp, peeled and deveined
- 5ml sweet butter
- 15ml sweet yellow pepper
- 15ml Poblano pepper
- 1 scallion, minced
- 15ml all purpose flour
- 250ml whipping cream
- 2-3 sprigs of fresh cilantro, leaves only, chiffonade
- 8 lobster legs, washed and trimmed
- 30ml cornstarch
- 1 cup tempura batter
- panko bread crumbs
Instructions:
- Cut lobster meat into 1-2 cm chunks and place in non-reactive bowl
- Scale shrimp into TM bowl, and pulse until puréed; add to the bowl of lobster, cover, and refrigerate
- Melt butter in small sautépan over medium heat; add yellow pepper, Poblano pepper, and scallion
- Sweat without adding any colour; about 3 minutes
- Add flour and stir until well coated
- Add whipping cream and cook until all liquid has completely evaporated; about 7-8 minutes
- Cool completely
- Add the cream mixture, and cilantro to the bowl with the lobster and shrimp; gently combine
- Dust the meat end of the lobster leg into the cornstarch; gently dip the tips of your fingers into it, as well
- Wrap 25g of lobster meat around each leg (and I did measure)
- Press the mixture firmly into an egg shape around the leg with your cornstarch covered fingers
- Here, Adjey says fry… I say make the tempura, dip each ball into the tempura, then into the panko crumbs and fry until golden brown; about 3-4 minutes
- Drain on paper towels and keep warm until ready to serve; serve with Lobster Sauce and Pink Peppercorn Aioli
Tempura Batter Recipe (I love this simple and light batter)
- rice flour
- soda water
Combine equal portions of each

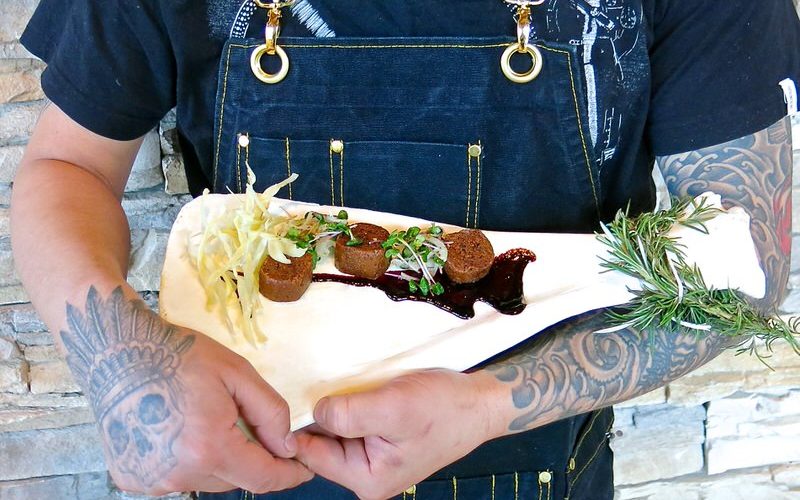
And then, there were three. But, they are gorgeous, aren’t they? This idea was absolutely brilliant.


Hi Valerie,
A tip for when you are cooking lobster is to have a BIG pot with lots of water, and then the temperature doesn’t drop so much when you put in the lobster. It comes back to the boil quicker. Your dish looked scrumptious! I think I will try the recipe!
Colleen
Thanks for the tip… that is why I only cooked one lobster in each pot – my huge soup pot was not available. I was able to cover the lobster completely, but yes… I see what you are saying, and that makes a lot of sense. I was reading about lobsters, and the jumbo ones will, apparently, feed and entire family. Each of these was just over 4 ounces of meat. I would have worked up so much energy eating them, that I would have been starving once finished with this amount. And the tails were small. That really surprised me. I expected them to be more ample. Do you know where, what time of year, or what kind I could find to have a much bigger lobster? At over a kilo each, I thought these were considered a fair size. But, I think not now that I see how little I got from each. If you make these, I want to hear every detail… photograph it… I really regret not getting a photo of the insides once bitten into.
Thanks for being my most loyal partner in all things food.
XO
I love shellfish so much, I’m dying to try these! They seem so labor-intensive.
Hi Valerie!
Mmmmmmm, lobster!!
Just wanted to drop you a note about one of your archived recipes. This weekend I tried your rum balls recipe and they turned out to be the best-tasting I’ve ever made. Just the right amount of rum without over-powering the other ingredients. I used Capt.Morgan spiced rum and rolled the rum balls in toasted coconut instead of chocolate sprinkles. Oh so yummy….thanks again for another classic recipe 🙂
Judy
Judith!
I am thrilled to hear that. That is why I do what I do, and this is the kind of message that will keep me smiling all week. Thank you for letting me know they turned out great!
Hmm I wish I could taste those fingers! beautiful
That is a great looking recipe – good explanatory pics as well. Lobster is not something I’ve ever really even thought about cooking so it was interesting to see how you did it.
And those three Creuset enamelled pans in the boiling lobster pic – what a trio of beauties!
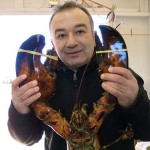
What an adventure! Looks like lots of fun. I have yet to cook a lobster.. it is on the list. Ole David is looking a little rough!
The lobster fingers look absolutely delicious.
As a child, my parents would always treat my brother and me to Crab Claws in Chinese restaurants. These remind me of an upscale version of them. Yum!
Those are some graphic shellfish photos!!
You went through so much work Valerie – I am impressed
Oh yes, and I was very jealous of your stove-top photos – beautiful pots!
Love love love the idea of lobster fingers and the presentation with the little claws, very cool!
Valerie thank you for visiting my blog today and leaving your sweet comments 🙂 I’m honoured you would drop by for a “bite” 😉 If it were in real life I would’ve had a proper pot of tea all ready. Hubby brought home 5 live lobsters for me for Christmas… it was the best present ever!
Valerie, before anything – may I just wax poetic over those gorgeous lobster fingers? I’m truly speechless at how beautifully executed and presented they are. Looks like you had a great time! LOVE your step by step photos and photos in general. I have little or no natural light in my place (surrounded by trees) so I use artificial lighting. If I had natural light, especially in the kitchen..I’d be step by stepping every dish I made!
On another note, I answered your questions under your comment in my comment section 🙂 Go check it out!
Holy cow, that’s impressive. The photos and the step by step instructions. Nice!
btw, I watched the Episode 4 of That Jew can Cook. I think you can compete with his Sunday Gravy. Our recipes are pretty similar. I do have a bracciole recipe on my food blog too, if you are interested in using that in the sauce.
I am really flattered that you enjoyed the recipe. Thanks.
I hope you left him a message! He is not the diva in front of that camera for nothing! i will be by to see your other recipe and then give him a run for his money!
🙂
Valerie..I answered you in my comment section again, but I’ll make it easier for you and copy it here 🙂
Valerie -I should be asking you these questions because your photos are absolutely beautiful! I use a Canon Digital Rebel XTi with a 50 mm f1.8 lens. I play with every f-stop, from the widest at f1.8 all the way to 22, and then take a few photos on auto. Whichever photo(s) look best (out of the hundred I take – seriously) is/are the one(s) I choose. I’m still such a complete novice, but if I had natural light, it would be so much easier to get a beautiful shot.
Oh..also..I need to start taking photos in manual (a matter of learning how to properly adjust the settuings without confusion lol) and learn RAW!!
I was lucky enough to be a NAIT student last year for the Rob Feenie chef in residence; by the looks of this, I should have re-enrolled.
WOW! I am so impressed by the way you handled this recipe so fearlessly ! I would have given the lobsters to the fishmongers and asked him to mess with the whole lot of them lol!
I AM SO IMPRESSED VALERIE! (repeat for emphasis!)
Joumana
You did a wonderful job with the lobster. I’m really impressed. I’m sending you an email regarding the questions you asked me.
very cool presentation – I would love some of these claws right now – first thing in the morning.
Hi Valerie,
I’m so full of admiration for the amazing photos and your lobster. I love eating it but feel way too scared to cook it myself. The sense of enjoyment you had at this event really comes over too – great job!
I don’t even remember when I last had some lobsters…these lobster fingers look absolutely gorgeous!
What fun this was to read about! I love lobster, make it often, but living in Florida makes it easy.
The lobster fingers look wonderful, if a tad time consuming to make. Would be fun to try for company!
These look fantastic! I also have to read your post on Iberico ham. I love Iberico ham. Thanks also for visiting my blog. I have no internet right now so it is almost impossible to keep in touch. I move into my house on Apr 6 so life will improve dramatically after my furniture is delivered. Hey, Swift Current isn’t that far from Edt!
Val, these look great — while you may have been disappointed withthe crust I bet they still tasted wonderful!
The filling looks similar to a lobster ravioli recipe I have — you have inspired me to try it…
Thanks for reviving this recipe. The rule of thumb, is 20 minutes for boiling lobster in a home setting (side burner on BBQ works great.) One should hold the lobster up, cross it’s claws with your two hands, then hold the crossed-claw lobster with one hand, cut the rubber bands off with your other hand and scissors, and plunge head-first into boiling water. Nothing worse than a rubber taste in Lobster. If you ask for “Hard Shell” lobsters, you will get lobsters with the fullest shells as opposed to “Soft Shell” lobster which have just molted, and have yet to grow into their new, larger shell. Thank’s again for this David Adjey classic.